
In this tutorial, we'll learn how to install NocoDB on Ubuntu 24.04 server.
What is NocoDB
NocoDB is an open-source no-code platform that converts traditional databases into smart, spreadsheet-style interfaces. It allows teams to manage data visually, collaborate in real time, and build workflows without writing a single line of code.
It supports popular databases such as MySQL, PostgreSQL, MariaDB, and SQLite, and exposes them through intuitive UI and robust REST APIs.
In simpler terms, NocoDB acts like an open-source Airtable alternative that runs entirely on our own infrastructure. It helps development teams, analysts, and business users connect to existing databases and start managing records, views, and forms instantly — without sacrificing control or privacy.
Why NocoDB
NocoDB turns relational databases into spreadsheet-style “no-code” interfaces. You get CRUD UI, query capabilities, REST APIs over existing tables—all without writing front-end code. Good choice if you want flexibility + control over data.
Prerequisites
Before we begin, ensure we have the following:
- An Ubuntu 24.04 dedicate server or KVM VPS.
- Basic Linux Command Line Knowledge.
- A domain name pointing A record to server IP.
How to Install NocoDB on Ubuntu 24.04
1. Prepare server
sudo apt update
sudo apt upgrade -y
sudo apt install -y curl git
2. Install Docker + Compose plugin
sudo apt install -y apt-transport-https ca-certificates software-properties-common
curl -fsSL https://download.docker.com/linux/ubuntu/gpg | sudo gpg --dearmor -o /usr/share/keyrings/docker-archive-keyring.gpg
echo \
  "deb [arch=$(dpkg --print-architecture) signed-by=/usr/share/keyrings/docker-archive-keyring.gpg] \
   https://download.docker.com/linux/ubuntu $(lsb_release -cs) stable" \
  | sudo tee /etc/apt/sources.list.d/docker.list > /dev/null

sudo apt update
sudo apt install -y docker-ce
Verify:
docker version
docker compose version
3. Create project directory
mkdir ~/nocodb && cd ~/nocodb
4. Write docker-compose.yml
nano docker-compose.yml
Add following content:
services:
  nocodb:
    image: nocodb/nocodb:latest
    container_name: nocodb
    ports:
      - "8080:8080"
    depends_on:
      - db
    environment:
      - NC_DB=pg://db:5432?u=nocodb&p=${PG_PASSWORD}&d=nocodb
      - NC_AUTH_JWT_SECRET=${NC_AUTH_JWT_SECRET}
    restart: unless-stopped

  db:
    image: postgres:15-alpine
    container_name: nocodb_db
    environment:
      - POSTGRES_USER=nocodb
      - POSTGRES_PASSWORD=${PG_PASSWORD}
      - POSTGRES_DB=nocodb
    volumes:
      - pgdata:/var/lib/postgresql/data
    restart: unless-stopped

volumes:
  nocodb_data:
  pgdata:
Important: use an .env file to store secrets.
Create .env in same folder with:
nano .env
Add following variable:
NC_AUTH_JWT_SECRET=some_random_hex_string
PG_PASSWORD=strong_password_here
Generate the JWT secret:
openssl rand -hex 32
5. Launch containers
docker compose up -d
Check status:
docker ps
docker compose logs -f
If things break, logs are your friend.
You’ll be prompted to register an admin account. After login, you can “Add Connection” to existing databases or use the built-in one.
6. Enable startup at boot
Docker Compose handles that (unless-stopped). But ensure Docker starts at boot:
sudo systemctl enable docker
7. Front your NocoDB via reverse proxy + SSL
You don’t want to expose port 8080 directly in prod. Use nginx + certbot for HTTPS.
Example:
sudo apt install -y nginx certbot python3-certbot-nginx
Add HTTP and HTTPS ports in firewall:
ufw allow 80/tcp
ufw allow 443/tcp
Create nginx config at /etc/nginx/sites-available/nocodb.conf:
nano /etc/nginx/sites-available/nocodb.conf
Add following content:
server {
  listen 80;
  server_name your.domain.com;

  location / {
    proxy_pass http://127.0.0.1:8080;
    proxy_set_header Host $host;
    proxy_set_header X-Real-IP $remote_addr;
    proxy_set_header X-Forwarded-For $proxy_add_x_forwarded_for;
  }
}
Enable it:
sudo ln -s /etc/nginx/sites-available/nocodb.conf /etc/nginx/sites-enabled/
sudo nginx -t
sudo systemctl reload nginx
Obtain SSL:
sudo certbot --nginx -d your.domain.com
Certbot will configure redirect and HTTPS. Test.
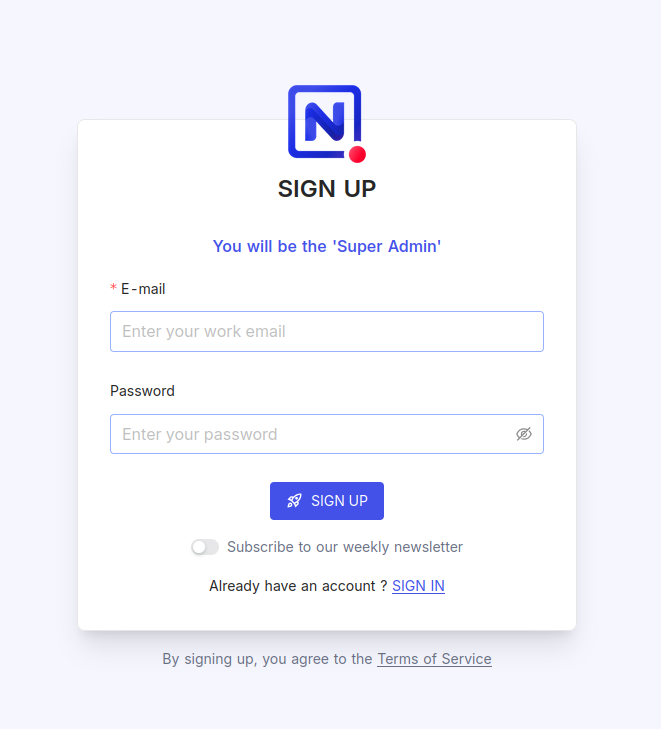
8. Access dashboard
navigate to your browser and access:
https://your.domain.com
You'll get admin signup page
9. Backups & maintenance
Backup data volume:
docker compose down
tar -czvf nocodb_backup_$(date +%F).tar.gz ./nocodb_data pgdata
Updates:
docker compose pull
docker compose up -d
Monitor logs:
docker compose logs -f
Scale / tweaks: you can add caching, redis, MinIO per your needs like the auto-upstall script does.
Conclusion
Installing NocoDB on Ubuntu 24.04 gives us a secure, scalable foundation for building no-code data applications on top of our existing databases. NocoDB delivers a full-featured, self-hosted platform that simplifies data collaboration and API management.
By pairing it with nginx and Certbot SSL, we ensure production-grade performance, HTTPS security, and reliability. Once running, NocoDB transforms any relational database into a dynamic, visual workspace — letting teams focus more on data and less on infrastructure.
