
In this tutorial, we'll learn to set up Flarum on AlmaLinux 10 with Nginx.
Flarum designed to help you launch a modern, self-hosted forum that stands out. Flarum is renowned for its speed, simplicity, and extensibility, making it an excellent choice for building vibrant online communities. We'll walk you through each step, providing clear explanations and the latest information to ensure a smooth installation.
Why Flarum?
Before we dive into the technicalities, let's briefly touch upon why Flarum is such a compelling platform. Unlike older forum software that can feel clunky and outdated, Flarum offers a fresh, responsive design that adapts beautifully to any device.
It's built with performance in mind, ensuring a snappy user experience. Furthermore, its modular architecture and powerful extension API mean you can customize it extensively to suit our specific community's needs, whether we're looking for a simple discussion board or a feature-rich social hub.
Prerequisites
To embark on this journey, we'll need a few things:
- An AlmaLinux 10 LTS dedicate server or KVM VPS
- Root or Sudo Privileges
- A Domain Name (Optional but Recommended)
- Basic Command Line Knowledge
Set up Flarum on AlmaLinux 10 with Nginx
Step 1: System Update and Essential Tools
First, we need to ensure our AlmaLinux 10 system is up-to-date and has the necessary tools for the installation.
sudo dnf update -y
Install Development Tools and Utilities:
We'll need wget for downloading files, git for cloning repositories, unzip for extracting archives, and a set of development tools for compiling potential dependencies.
sudo dnf groupinstall "Development Tools" -y
sudo dnf install wget git unzip -y
Step 2: Install Nginx
Nginx will serve as our web server. We can install it directly from the AlmaLinux repositories.
sudo dnf install nginx -y
We'll start the Nginx service and configure it to launch automatically on system boot.
sudo systemctl start nginx
sudo systemctl enable nginx
sudo systemctl status nginx
Verify that the status is "active (running)".
If firewalld is active, we need to allow HTTP and HTTPS traffic through the firewall.
sudo firewall-cmd --permanent --add-service=http
sudo firewall-cmd --permanent --add-service=https
sudo firewall-cmd --reload
Now, if we navigate to our server's IP address in a web browser, we should see the default Nginx welcome page.
Step 3: Install MariaDB Database Server
Flarum requires a database to store its data. MariaDB is a popular and robust choice.
Install MariaDB:
sudo dnf install mariadb-server -y
Start and Enable MariaDB:
sudo systemctl start mariadb
sudo systemctl enable mariadb
sudo systemctl status mariadb
Confirm that MariaDB is "active (running)".
Secure MariaDB Installation:
It's crucial to secure our MariaDB installation by running the security script. This will prompt us to set a root password, remove anonymous users, disallow remote root login, and remove the test database.
sudo mysql_secure_installation
Follow the prompts carefully, choosing strong passwords.
Create a Database and User for Flarum:
Now, let's log into the MariaDB shell and create a dedicated database and user for our Flarum installation. Replace 'your_flarum_database', 'your_flarum_user', and 'your_strong_password' with our desired values.
sudo mysql -u root -p
Enter the MariaDB root password we set in the previous step.
Inside the MariaDB prompt, execute:
CREATE DATABASE your_flarum_database CHARACTER SET utf8mb4 COLLATE utf8mb4_unicode_ci;
CREATE USER 'your_flarum_user'@'localhost' IDENTIFIED BY 'your_strong_password';
GRANT ALL PRIVILEGES ON your_flarum_database.* TO 'your_flarum_user'@'localhost';
FLUSH PRIVILEGES;
EXIT;
This creates a database, a user, grants all necessary privileges, and then applies the changes.
Step 4: Install PHP and FPM
Flarum is a PHP application, and Nginx needs PHP-FPM (FastCGI Process Manager) to process PHP code. AlmaLinux 10 provides modern PHP 8.3 versions.
Install PHP and Required Extensions:
Flarum requires several PHP extensions. We'll install them along with php-fpm.
sudo dnf install php-fpm php-cli php-mysqlnd php-gd php-mbstring php-json php-xml php-zip php-pdo php-tokenizer php-fileinfo php-curl -y
Configure PHP-FPM:
We need to adjust the PHP-FPM configuration to work seamlessly with Nginx. We'll edit the www.conf pool configuration file.
sudo nano /etc/php-fpm.d/www.conf
Locate the user and group directives and change their values from apache to nginx:
user = nginx
group = nginx
Also, ensure the listen directive is set to a Unix socket, which is generally more performant for local communication. It should look like this:
listen = /run/php-fpm/www.sock
listen.owner = nginx
listen.group = nginx
Save and close the file (Ctrl+X, Y, Enter).
Start and Enable PHP-FPM:
sudo systemctl start php-fpm
sudo systemctl enable php-fpm
sudo systemctl status php-fpm
Verify it's running.
Step 5: Install Composer
Composer is essential for Flarum's installation and ongoing management.
Download Composer Installer:
php -r "copy('https://getcomposer.org/installer', 'composer-setup.php');"
Verify and Install Composer:
sudo php composer-setup.php --install-dir=/usr/local/bin --filename=composer
Step 6: Install Flarum
Now that our environment is ready, we can proceed with installing Flarum.
Create Flarum Installation Directory:
We'll create a dedicated directory for our Flarum forum. We recommend placing it in /var/www/.
sudo mkdir -p /var/www/your_forum_domain
sudo chown -R nginx:nginx /var/www/your_forum_domain
sudo chmod -R 775 /var/www/your_forum_domain
Replace your_forum_domain with our actual domain or desired directory name.
Navigate to the Directory:
cd /var/www/your_forum_domain
Install Flarum using Composer:
This command will download and set up all Flarum's files and dependencies. This might take a few minutes.
composer create-project flarum/flarum . --stability=beta
The --stability=beta flag is used because Flarum is still in beta, though it's quite stable for production use.
Set Directory Permissions:
Flarum needs specific permissions for its storage and assets directories to function correctly.
sudo chown -R nginx:nginx /var/www/your_forum_domain
sudo chmod -R 775 /var/www/your_forum_domain/storage
sudo chmod -R 775 /var/www/your_forum_domain/public/assets
Step 7: Configure Nginx for Flarum
This is a crucial step to tell Nginx how to serve our Flarum application.
Create a Nginx Server Block Configuration File:
We'll create a new configuration file for our Flarum forum.
sudo nano /etc/nginx/conf.d/flarum.conf
Add Nginx Configuration:
Paste the following configuration. Remember to replace your_forum_domain with our actual domain name, and ensure the root directive points to Flarum's public directory. If we plan to use SSL, we'll configure that in a later step (or adapt this one for HTTPS).
server {
    listen 80;
    listen [::]:80;
    server_name your_forum_domain www.your_forum_domain;
    root /var/www/your_forum_domain/public;
    index index.php index.html index.htm;

    charset utf-8;

    location / {
        try_files $uri $uri/ /index.php?$query_string;
    }

    location ~ \.php$ {
        fastcgi_pass unix:/run/php-fpm/www.sock; # Ensure this matches our php-fpm pool config
        fastcgi_index index.php;
        fastcgi_param SCRIPT_FILENAME $document_root$fastcgi_script_name;
        include fastcgi_params;
    }

    location ~* \.(css|js|gif|jpe?g|png|json)$ {
        expires 1M;
        access_log off;
        add_header Cache-Control "public";
    }

    location ~ /\.ht {
        deny all;
    }

    # Prevent sensitive resources from being exposed
    location ~* ^/(composer\.(json|lock)|\.env|flarum|storage|vendor) {
        deny all;
        return 404;
    }
}
Save and close the file.
Test Nginx Configuration:
Before restarting Nginx, it's good practice to test our configuration for syntax errors.
sudo nginx -t
If we see "syntax is ok" and "test is successful," we're good to go.
Reload Nginx:
sudo systemctl reload nginx
Configure SELinx (If enabled)
you might need to configure SELinux to allow the web server to write to the directory. To do so, run:
chcon -R -t httpd_sys_rw_content_t /var/www/your_forum_domain/
Troubleshooting
If you get any issue of permission in the browser try to disable SELinux and try again. Execute following commands if needed:
sudo setsebool -P httpd_can_network_connect 1
sudo semanage fcontext -a -t httpd_sys_rw_content_t "/var/www/your_forum_domain/storage(/.*)?"
sudo semanage fcontext -a -t httpd_sys_rw_content_t "/var/www/your_forum_domain/public/assets(/.*)?"
Step 8: Configure HTTPS with Let's Encrypt
For a secure and trustworthy forum, we strongly recommend enabling HTTPS. Let's Encrypt provides free SSL/TLS certificates.
Install Certbot:
sudo dnf install certbot python3-certbot-nginx -y
Obtain SSL Certificate:
sudo certbot --nginx -d your_forum_domain -d www.your_forum_domain
Step 9: Complete Flarum Installation via Web Installer
Now, we can access our Flarum forum in a web browser and complete the installation.
Navigate to our Domain:
Open a web browser and go to http://your_forum_domain.
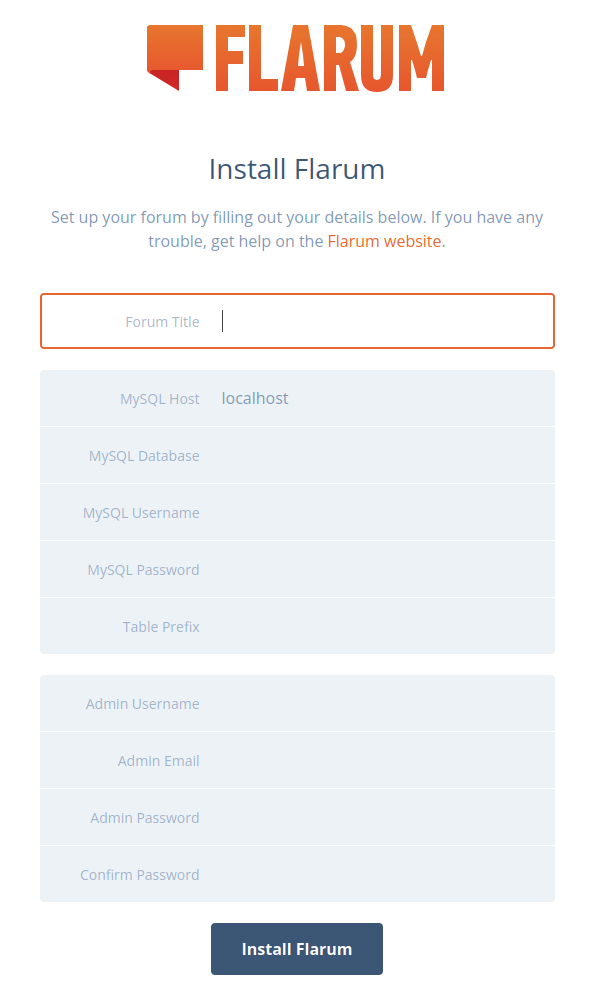
Flarum Installation Wizard:
We should be greeted by the Flarum installation wizard. We'll need to provide the following information:
Forum Title: Our desired forum name.
Database Details:
- Host: localhost
- Port: 3306 (default for MariaDB/MySQL)
- Database Name: your_flarum_database (the one we created earlier)
- Username: your_flarum_user (the one we created earlier)
- Password: your_strong_password (the one we created earlier)
- Administrator Account: Create an admin username, email, and password for our forum.
Install Flarum:
Click the "Install Flarum" button. The installer will set up the database, create necessary files, and finalize the installation.
Follow the prompts to configure automatic redirection to HTTPS and set up renewal.
Enable PHP Opcache:
OPcache significantly improves PHP performance by caching compiled PHP bytecode. It's usually enabled by default with Remi's PHP, but we can verify its settings.
sudo nano /etc/php.d/10-opcache.ini
Ensure opcache.enable=1 and opcache.enable_cli=1 are set. We might also adjust opcache.memory_consumption for larger forums. After any changes, restart PHP-FPM:
sudo systemctl restart php-fpm
Configure Cron Job for Flarum Scheduler:
Flarum uses a scheduler for tasks like clearing old data or sending digest emails. We need to set up a cron job.
sudo crontab -e
Add the following line at the end of the file:
* * * * * cd /var/www/your_forum_domain && php flarum schedule:run >> /dev/null 2>&1
Save and exit.
Conclusion
We've successfully set up Flarum on AlmaLinux 10 with Nginx, creating a solid foundation for our modern self-hosted forum. From preparing our server and installing essential components like Nginx, MariaDB, and PHP-FPM, to finally deploying Flarum and securing it with HTTPS, we've covered every crucial step.
The new forum is now ready for us to customize, extend, and grow into a thriving online community. Remember to regularly update Flarum and its extensions, and always maintain backups of our database and files. Happy forum building!
