
In this tutorial, we'll learn to set up Flarum on Ubuntu 24.04 with Nginx.
Flarum designed to help you launch a modern, self-hosted forum that stands out. Flarum is renowned for its speed, simplicity, and extensibility, making it an excellent choice for building vibrant online communities. We'll walk you through each step, providing clear explanations and the latest information to ensure a smooth installation.
Why Flarum?
Before we dive into the technicalities, let's briefly touch upon why Flarum is such a compelling platform. Unlike older forum software that can feel clunky and outdated, Flarum offers a fresh, responsive design that adapts beautifully to any device. It's built with performance in mind, ensuring a snappy user experience. Furthermore, its modular architecture and powerful extension API mean you can customize it extensively to suit our specific community's needs, whether we're looking for a simple discussion board or a feature-rich social hub.
When comparing Flarum to alternatives like Discourse or phpBB, Flarum often wins on its lightweight nature and modern aesthetics. While Discourse is powerful, it can be resource-intensive. phpBB, while highly stable, can feel a bit dated in its default appearance. Flarum strikes a fantastic balance, offering a modern look and feel without demanding excessive server resources, making it suitable even for modest VPS setups.
Prerequisites
To embark on this journey, we'll need a few things:
- An Ubuntu 24.04 LTS dedicate server or KVM VPS
- Root or Sudo Privileges
- A Domain Name (Optional but Recommended)
- Basic Command Line Knowledge
Step 1: Prepare Our Ubuntu Server
First things first, let's ensure our Ubuntu server is up-to-date and has the necessary packages.
sudo apt update
sudo apt upgrade -y
Install Essential Tools:
We'll need curl to download files and unzip for extracting archives.
sudo apt install curl unzip -y
Step 2: Install Nginx Web Server
Nginx is a high-performance web server that will serve our Flarum application. It's known for its efficiency and scalability.
sudo apt install nginx -y
Verify Nginx Installation:
To confirm Nginx is running, check its status.
sudo systemctl status nginx
We should see "active (running)" in the output. If not, we can start it with sudo systemctl start nginx.
Configure Firewall for Nginx:
If we have a firewall enabled (which we should for security), we need to allow HTTP and HTTPS traffic. Ubuntu's UFW (Uncomplicated Firewall) makes this straightforward.
sudo ufw allow 'Nginx HTTP'
sudo ufw allow 'Nginx HTTPS' # We'll enable HTTPS later, but it's good to allow now.
sudo ufw enable # If the firewall isn't already enabled
sudo ufw status
We should see rules for Nginx HTTP and HTTPS.
Step 3: Install PHP and Required Extensions
Flarum is built with PHP, so we need to install PHP-FPM (FastCGI Process Manager) and several PHP extensions that Flarum relies on. We recommend using PHP 8.3 or newer for optimal performance and security.
sudo apt install php-fpm php-mysql php-gd php-curl php-mbstring php-xml php-zip php-bcmath php-gmp php-dom php-json php-tokenizer -y
- php-fpm: The FastCGI Process Manager for PHP, essential for Nginx to process PHP.
- php-mysql: Enables PHP to connect to MySQL/MariaDB databases.
- php-gd: Required for image manipulation (e.g., user avatars).
- php-curl: Enables PHP to make HTTP requests.
- php-mbstring: Provides multi-byte string functions, crucial for handling various character sets.
- php-xml: For XML parsing.
- php-zip: For handling zip archives.
- php-bcmath: For arbitrary precision mathematics.
- php-gmp: For GNU Multiple Precision arithmetic.
- php-dom: For working with XML/HTML documents.
- php-json: For JSON data handling.
- php-tokenizer: For tokenizing PHP source code.
Adjust PHP-FPM Configuration:
We'll need to make a small adjustment to the php.ini file to optimize Flarum's performance and handle potential file uploads.
sudo nano /etc/php/8.3/fpm/php.ini
Find and modify the following lines (you can use Ctrl+W to search):
memory_limit = 256M
upload_max_filesize = 150M
post_max_size = 150M
max_execution_time = 300
Save the file (Ctrl+X, then Y, then Enter).
Restart PHP-FPM Service. After modifying php.ini, we must restart PHP-FPM for the changes to take effect.
sudo systemctl restart php-fpm
Step 4: Install MariaDB Database Server
Flarum requires a database to store its information. MariaDB is a popular and robust choice, compatible with MySQL.
sudo apt install mariadb-server -y
Secure MariaDB Installation:
It's crucial to run the security script to enhance our database server's security.
sudo mysql_secure_installation
Follow the prompts:
- "Enter current password for root (enter for none):" Press Enter if you haven't set a root password yet.
- "Set root password? [Y/n]" Type Y and set a strong password.
- "Remove anonymous users? [Y/n]" Type Y.
- "Disallow root login remotely? [Y/n]" Type Y (recommended for security).
- "Remove test database and access to it? [Y/n]" Type Y.
- "Reload privilege tables now? [Y/n]" Type Y.
Create a Database and User for Flarum:
Now, let's create a dedicated database and user for our Flarum installation. This is a best practice for security and organization.
sudo mysql -u root -p
Enter the root password we set earlier. Then, execute the following commands, replacing flarum_db, flarum_user, and your_strong_password with our preferred names and a strong password:
CREATE DATABASE flarum_db CHARACTER SET utf8mb4 COLLATE utf8mb4_unicode_ci;
CREATE USER 'flarum_user'@'localhost' IDENTIFIED BY 'your_strong_password';
GRANT ALL PRIVILEGES ON flarum_db.* TO 'flarum_user'@'localhost';
FLUSH PRIVILEGES;
EXIT;
We used utf8mb4 for character set and utf8mb4_unicode_ci for collation to ensure proper handling of various characters and emojis, which is important for a modern forum.
Step 5: Install Composer
Composer is a dependency manager for PHP, and Flarum relies on it for installation and managing extensions.
curl -sS https://getcomposer.org/installer | php
sudo mv composer.phar /usr/local/bin/composer
Verify Composer Installation:
composer -V
This should display the Composer version.
Step 6: Install Flarum
Now, we're ready to install Flarum itself using Composer.
We'll create a directory under /var/www/ for our Flarum installation. We recommend naming it after our domain or project.
sudo mkdir -p /var/www/your_forum_domain
cd /var/www/your_forum_domain
Install Flarum using Composer:
This command will download the latest stable version of Flarum into the current directory.
sudo composer create-project flarum/flarum . --stability=stable
The --stability=stable flag ensures we get the most recent stable release. Flarum has come a long way since its beta days and is now very robust.
Set Directory Permissions:
Proper file permissions are crucial for Flarum to function correctly and securely. The web server user (typically www-data on Ubuntu) needs write access to certain directories.
sudo chown -R www-data:www-data /var/www/your_forum_domain
sudo chmod -R 775 /var/www/your_forum_domain/storage
sudo chmod -R 775 /var/www/your_forum_domain/assets
sudo chmod -R 775 /var/www/your_forum_domain/extensions
sudo chmod -R 775 /var/www/your_forum_domain/public/assets
Step 7: Configure Nginx for Flarum
Now we need to tell Nginx how to serve our Flarum forum. This involves creating a new server block configuration file.
sudo nano /etc/nginx/sites-available/your_forum_domain.conf
Paste the following configuration, replacing your_forum_domain with our actual domain name, and /var/www/your_forum_domain with the path to our Flarum installation.
server {
    listen 80;
    listen [::]:80;
    server_name your_forum_domain www.your_forum_domain;
    root /var/www/your_forum_domain/public;
    index index.php index.html index.htm;

    location ~ \.php$ {
        include snippets/fastcgi-php.conf;
        fastcgi_pass unix:/var/run/php/php8.3-fpm.sock; # Ensure this matches our PHP-FPM version
        fastcgi_param SCRIPT_FILENAME $document_root$fastcgi_script_name;
        include fastcgi_params;
    }

    location ~ /\.ht {
        deny all;
    }

    # Include Flarum's own Nginx configuration for specific rewrites
    include /var/www/your_forum_domain/.nginx.conf;
}
Save and close the file.
Enable the Nginx Server Block:
We need to create a symbolic link from sites-available to sites-enabled to activate our new configuration.
sudo ln -s /etc/nginx/sites-available/your_forum_domain.conf /etc/nginx/sites-enabled/
Test Nginx Configuration:
Before restarting Nginx, it's always a good idea to test the configuration for any syntax errors.
sudo nginx -t
We should see "syntax is ok" and "test is successful". If there are errors, review our .conf file carefully.
Apply the new configuration by restarting Nginx.
sudo systemctl restart nginx
Step 8: Configure SSL
Our Flarum forum is now up and running! Here are some crucial steps and best practices to ensure its security and smooth operation.
Configure HTTPS with Let's Encrypt (Highly Recommended):
Securing our forum with HTTPS is paramount for data privacy and SEO. Let's Encrypt provides free SSL/TLS certificates.
sudo apt install certbot python3-certbot-nginx -y
Obtain SSL Certificate:
sudo certbot --nginx -d your_forum_domain -d www.your_forum_domain
Step 9: Complete Flarum Installation via Web Browser
With Nginx, PHP, and MariaDB configured, we can now complete the Flarum installation through our web browser. Access Our Forum:
Open our web browser and navigate to our domain name (e.g., http://your_forum_domain). If everything is configured correctly, we should see the Flarum installation wizard.
Fill in Installation Details:
The wizard will prompt us for the following information:
Forum Title: The name of our forum.
Base URL: Our forum's URL (e.g., https://your_forum_domain).
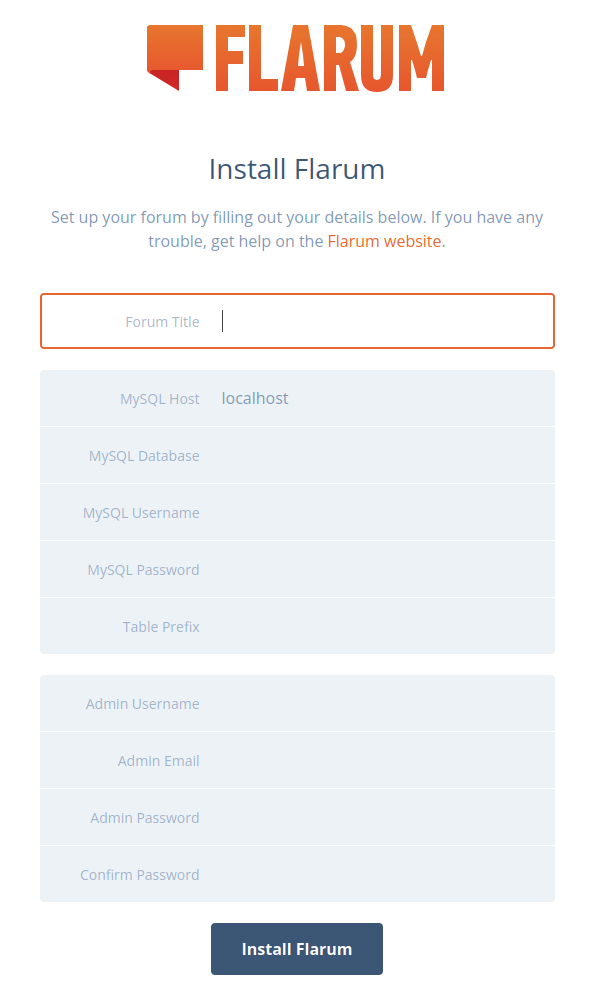
- MySQL Host: Usually localhost.
- MySQL Database: The database name we created (e.g., flarum_db).
- MySQL Username: The database user we created (e.g., flarum_user).
- MySQL Password: The password for our database user.
- Admin Username: Our desired admin username.
- Admin Email: Our admin email address.
- Admin Password: A strong password for our admin account.
Install Flarum:
After filling in all the details, click the "Install Flarum" button. The installer will set up the database, create configuration files, and complete the installation.
Once the installation is complete, we'll be redirected to our newly installed Flarum forum. We can log in with the admin credentials we just created.
Review Flarum Permissions:
While we set initial permissions, it's good practice to periodically review them. Flarum documentation recommends the web server user (www-data) having read+write access to:
- The root install directory (so Flarum can edit config.php).
- The storage subdirectory (for logs and cached data).
- The assets subdirectory (for uploaded content like avatars and logos).
- The extensions subdirectory (for managing extensions).
Update Flarum and Extensions Regularly:
Flarum is actively developed, and updates often include security patches and new features. Keep our Flarum core and all installed extensions up-to-date. We can do this via Composer:
cd /var/www/your_forum_domain
sudo -u www-data composer update
php flarum migrate
php flarum cache:clear
Running sudo -u www-data composer update ensures that Composer runs as the web server user, which avoids permission issues. php flarum migrate runs any necessary database migrations, and php flarum cache:clear clears the Flarum cache after updates.
Conclusion
We've now successfully set up a modern Flarum forum on our Ubuntu server with Nginx. By following these steps, we've laid a solid foundation for a fast, secure, and engaging online community. Happy forum building!
